OS 為 CentOS 6.5 i386
Server 為 CentOS 5.3 i386
1.主機 ping Server's IP 為可通
2.ssh 或 telnet Server's IP 無反應,但連接其他 Server 為正常
下指令 netstat -ant 顯示為 “SYN_SENT”
google 以後有文章表示要修改
#vi /etc/sysctl.conf
新增一行
net.ipv4.tcp_timestamps = 0
執行
#/sbin/sysctl -p
reference:http://2sitebbs.com/thread-1544-1-1.html
2014年11月24日

2014年7月2日
2014年4月15日
修改 snmp 預設使用的 port
snmp 預設使用的 port 為 UDP 161
現在要改成10168的話可以這樣改
#vi /etc/snmp/snmpd.conf
agentaddress 10168
然後重新啟動即可
來源:http://osdir.com/ml/network.net-snmp.user/2004-01/msg00035.html
現在要改成10168的話可以這樣改
#vi /etc/snmp/snmpd.conf
agentaddress 10168
然後重新啟動即可
來源:http://osdir.com/ml/network.net-snmp.user/2004-01/msg00035.html
2014年1月23日
使用 shell script 和 ping 自動測試網路品質
#!/bin/bash

#同時測試4條線路,所以設定4個TMP檔

for q in 1 2 3 4; do

eval TMP$q=/root/zh/pp/pg$q.tmp

done


date=$(date +%Y%m%d)

dates=$(date +%Y%m%d_%H%M%S)


#每天一個檔案

datepp=/root/zh/pp/pg_${date}.log


#清除暫存檔

rm -f /root/zh/pp/pg*.tmp


#利用 function 來跑,只顯示最下面兩行統計

function p1(){

echo "8.8.8.8" >> $TMP1

ping -c 1000 "8.8.8.8" | grep -v "8.8.8.8" | awk -F, 'NR==2,NR==3{print }' >> $TMP1

}


function p2(){

echo "8.8.4.4" >> $TMP2

ping -c 1000 "8.8.4.4" | grep -v "8.8.4.4" | awk -F, 'NR==2,NR==3{print }' >> $TMP2

}


function p3(){

echo "168.95.1.1" >> $TMP3

ping -c 1000 "168.95.1.1" | grep -v "168.95.1.1" | awk -F, 'NR==2,NR==3{print }' >> $TMP3

}


function p4(){

echo "168.95.192.1" >> $TMP4

ping -c 1000 "168.95.192.1" | grep -v "168.95.192.1" | awk -F, 'NR==2,NR==3{print }' >> $TMP4

}


#把開始時間寫入檔案內

echo "${dates}_Start" >> $datepp


#跑4次迴圈來跑4個 function

i=1

while [ "$i" -le "4" ];do

p$i &

i=`expr $i + 1`

done


# 等4個process都執行完

wait


#讀取4個TMP檔寫入同一個檔案內

for j in 1 2 3 4; do

eval "cat \$TMP$j >> $datepp

done


#結束時間

datee=$(date +%Y%m%d_%H%M%S)

echo "${datee}_End" >> $datepp


#清除暫存檔

rm -f /root/zh/pp/pg*.tmp
上面是固定 ping 1000 次然後顯示結果,把下面幾個地方改掉後、可以自訂 ping 的次數
"ping -c 1000" 改成 "ping -c $1"

"p$i &" 改成 "p$i $1 &"


執行時變成

"./test.sh" 改成 "./test.sh 10"
參考資料
http://www.ptt.cc/bbs/Linux/M.1258710577.A.296.html
http://www.ptt.cc/bbs/Linux/M.1390400451.A.B51.html
2014年1月15日
windows 開機自動撥接ADSL
將下面這行用記事本存成 auto.cmd (win8.1 要兩行、其他都一行)
"Win + R" 啟動 "執行"
將 auto.cmd 丟進去啟動資料夾
rasdial "連線名稱" 帳號 密碼"Win + R" 啟動 "執行"
shell:startup將 auto.cmd 丟進去啟動資料夾
2014年1月14日
fping - 一次 ping 多部主機
Linux 版 http://fping.org/
Windows 版 http://www.kwakkelflap.com/fping.html
指令模式
$ fping -g 192.168.168.70 192.168.168.75
參數
-a 顯示有回應的主機
-A 顯示主機IP位址
-c n 每一host發送n個封包
-C n 同 -c 但顯示模式不太一樣
-d 解析主機名稱
-s 產生總結報告
-g 對範圍host發送封包,也可以用 192.168.168.0/24
ex.fping -g 192.168.168.0/24
-f 從文件讀取主機列表
詳細說明頁面
http://fping.org/fping.1.html
Windows 版 http://www.kwakkelflap.com/fping.html
指令模式
$ fping -g 192.168.168.70 192.168.168.75
參數
-a 顯示有回應的主機
-A 顯示主機IP位址
-c n 每一host發送n個封包
-C n 同 -c 但顯示模式不太一樣
-d 解析主機名稱
-s 產生總結報告
-g 對範圍host發送封包,也可以用 192.168.168.0/24
ex.fping -g 192.168.168.0/24
-f 從文件讀取主機列表
詳細說明頁面
http://fping.org/fping.1.html
2013年12月16日
Juniper EX2200 使用USB更新韌體
本來是用 TFTP 更新,不過因為 jinstall 檔案太大、動不動就斷線,有人提示可以使用 USB 更新。
不過測試時,USB 更新還是有點小不穩,最好的方法還是把檔案先複製到 /var/tmp 下面再更新。
1.Install Junos on the EX switch via the CLI (Command Line Interface) prompt:
Mount the USB device to the switch:
root@switch01:RE:0% mount_msdosfs /dev/da1s1 /mnt/
root@switch01:RE:0% cli
root@switch01> request system software add validate /mnt/ex2200/jinstall-ex-2200-12.3R3.4-domestic-signed.tgz
2.Reboot the EX switch:
root@switch01> request system reboot
3.After the reboot has completed, log in and verify that the new version of the software is properly installed:
user@switch> show version
原始網頁:http://kb.juniper.net/InfoCenter/index?page=content&id=KB20552#USB
PS.12.3R3.4版本更新最好跑 jloader 去更新、才不會有下面的 alarm 訊息發生
Upgrade bank is empty or corrupted for FPC 0, please do standard upgrade sequence
文章來源
http://forums.juniper.net/t5/Junos-and-Junosphere/Upgrade-bank-is-empty-or-cor
rupted-for-FPC-0-please-do-standard/m-p/153702//true?searchid=1277948172702#
http://goo.gl/isjBkB
root@switch01> request system software add validate /var/tmp/jloader-ex-2200-11.3I20110326_0802_hmerge-signed.tgz
root@switch01> request system reboot
問題
root> ...r-ex-2200-11.3I20110326_0802_hmerge-signed.tgz
tar: +CONTENTS: time stamp Mar 26 12:11 2011 is 9669669 s in the future
tar: +COMMENT: time stamp Mar 26 12:11 2011 is 9669669 s in the future
tar: +DESC: time stamp Mar 26 12:11 2011 is 9669669 s in the future
tar: +INSTALL: time stamp Mar 26 12:11 2011 is 9669668 s in the future
tar: jloader-ex-2200-11.3I20110326_0802_hmerge.tgz: time stamp Mar 26 11:56 2011 is 9668795 s in the future
tar: jloader-ex-2200-11.3I20110326_0802_hmerge.tgz.md5: time stamp Mar 26 12:11 2011 is 9669667 s in the future
tar: jloader-ex-2200-11.3I20110326_0802_hmerge.tgz.sha1: time stamp Mar 26 12:11 2011 is 9669667 s in the future
tar: jloader-ex-2200-11.3I20110326_0802_hmerge.tgz.sig: time stamp Mar 26 12:11 2011 is 9669667 s in the future
tar: certs.pem: time stamp Mar 26 08:02 2011 is 9654776 s in the future
verify-sig: cannot validate ./certs.pem
certificate is not yet valid: /C=US/ST=CA/L=Sunnyvale/O=Juniper Networks/OU=Juniper CA/CN=PackageDevelopment_11_3_0/emailAddress=ca@juniper.net
解法
http://kb.juniper.net/InfoCenter/index?page=content&id=KB21424
SOLUTION:
The problem is that the date of the switch is set to a date earlier than the date on which the jloader was built, therefore the certificate for the file is not yet valid. The solution is to either synchronize the date on the switch to a NTP server or to manually set the date. To manually set the date to July 7th 2011 5:00PM, use the following command:
root@switch> set date 201107071700.00
Thu Jul 7 17:00:00 UTC 2011
root@switch>
Running the command request system software add <package-name> will not display any more errors at this point.
2013年10月23日
iptables 筆記

架構如上
目標: PC 透過 PC1 的 port 9999 連到 PC2 的 port 3306
問題:因為 PC2 因為某些因素也有撥接,所以 PC2 Default Gateway 為 PPP0,導致透過 PC1 內網轉過來的封包會回不去。
解法:經過網友的教學,作法要搭配 mangle table 和 fwmark 來做
下面設定皆在 PC1
iptables -t mangle -A PREROUTING -i ppp0 -p tcp --dport 9999 -j MARK \

--set-mark 0x1/0x1

iptables -t nat -A PREROUTING -m mark --mark 0x1/0x1 -p tcp -j DNAT \

--to-destination 192.168.1.250:3306

iptables -t nat -A POSTROUTING -d 192.168.1.250 -m mark --mark 0x1/0x1 \

-j MASQUERADE
http://www.ptt.cc/bbs/Linux/M.1382444566.A.BB6.html
2013年9月7日
檢查網址 IP 有無變動並紀錄
簡單的 Shell Script , 用來 check 某網址 ip 有無變動,有的話紀錄在檔案內
#!/bin/bash

old=`tail -n1 IP.txt`

new=`nslookup www.google.com | grep -A1 google | grep Address | awk '{print $2}'`

if [ "$new" != "$old" ];then

   date >> IP.txt

   echo $new >> IP.txt

fi
2013年9月2日
用 Xshell 快速建立 SSH Tunnel 通道瀏覽網頁,上PTT
最近發現 Xshell 這個好用的 ssh 軟體,真的是相見恨晚。雖然有點肥,光安裝檔就要 2XMBM,但是整體功能比 PieTTY 和 SSH Secure shell 真的是強太多了。
這次發現利用 Xshell 可以快速又簡單的建立自己的 VPN 通道來讓瀏覽器或是 PCMAN 使用,當然前提是要有可以用 SSH 登入的主機,如果在主機又在國外的話,這樣就不怕被查IP了(無誤
1.用 Xshell 的 SSH Tunnel 瀏覽網頁
這次發現利用 Xshell 可以快速又簡單的建立自己的 VPN 通道來讓瀏覽器或是 PCMAN 使用,當然前提是要有可以用 SSH 登入的主機,如果在主機又在國外的話,這樣就不怕被查IP了(無誤
1.用 Xshell 的 SSH Tunnel 瀏覽網頁
連線 > SSH > 通道 。點選新增,類型選 Dynamic(SOCKS4/5) port 我是設定 1080,好了後點確定,然後連線主機
PS.如果 只接收本機連線 沒有打勾的話,那同區網的便可以利用你的電腦達到一樣的效果

瀏覽器在 proxy 設定的地方要設定在 Socks 這邊,成功後可以隨便到一個查IP的網站看,IP是不是變成遠端主機的IP

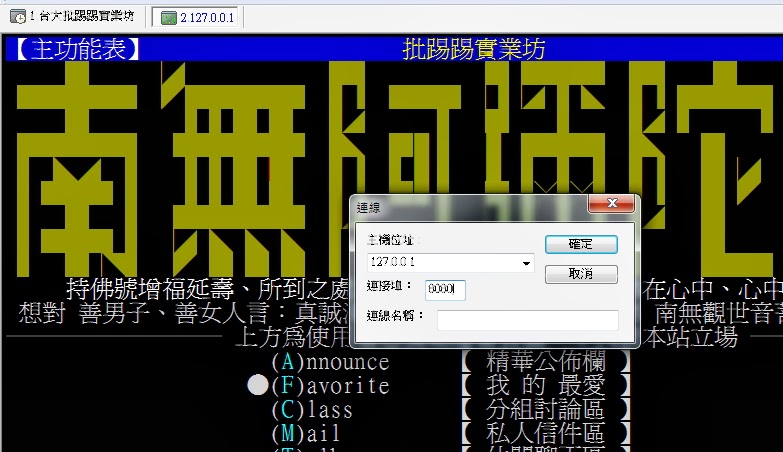
2.用 Xshell 的 SSH Tunnel 上 PTT
類型選 Local,主機 localhost,port 也是自訂
目的地打 ptt的網址和port

PCMAN 裡面選擇連線到本機電腦即可

參考網頁:
http://www.ahowto.net/windows/easily-create-ssh-tunneling-using-xshell-free-ssh-client
http://blog.xuite.net/vexed/tech/14718287

瀏覽器在 proxy 設定的地方要設定在 Socks 這邊,成功後可以隨便到一個查IP的網站看,IP是不是變成遠端主機的IP

2.用 Xshell 的 SSH Tunnel 上 PTT
類型選 Local,主機 localhost,port 也是自訂
目的地打 ptt的網址和port

PCMAN 裡面選擇連線到本機電腦即可
參考網頁:
http://www.ahowto.net/windows/easily-create-ssh-tunneling-using-xshell-free-ssh-client
http://blog.xuite.net/vexed/tech/14718287
2013年8月28日

2013年5月5日
Asus RT-N16 原廠韌體 ipv6 設定
中華電信使用者目前使用ipv6有三個辦法
1.臨櫃帶雙證件申請 Dual Stack Service 服務
2.直接下載 gogoCLIENT Utility 安裝後執行撥接
3.到 He.net 申請 Tunnel Broker 服務
3.到 He.net 申請 Tunnel Broker 服務
2013年2月6日
CentOS 6.3 學習筆記 (22) - 依 port 走不同主機
主 gateway 設為 server B , 若目標 port 為 80 or 443 or 通訊協定為 udp or icmp 則走 server A 的 VPN 出去
server A
ADSL + VPN
NAT
區網IP 192.168.1.1
server B
ADSL
NAT
區網IP 192.168.1.2
user端
ip 192.168.1.1x
gateway 192.168.1.2
server A
ADSL + VPN
NAT
區網IP 192.168.1.1
server B
ADSL
NAT
區網IP 192.168.1.2
user端
ip 192.168.1.1x
gateway 192.168.1.2
2012年11月22日
CentOS 6.3 學習筆記 (13) - ntop 安裝筆記
1. 安裝所需的套件
#yum -y install gcc gcc-c++ libpcap-devel libpcap libtool automake autoconf gdbm gdbm-devel libevent libevent-devel rrdtool rrdtool-devel zlib zlib-devel subversion make python python-devel
#rpm -Uvh http://pkgs.repoforge.org/geoip/geoip-1.4.6-1.el6.rf.i686.rpm
http://pkgs.repoforge.org/geoip/geoip-devel-1.4.6-1.el6.rf.i686.rpm
#yum -y install gcc gcc-c++ libpcap-devel libpcap libtool automake autoconf gdbm gdbm-devel libevent libevent-devel rrdtool rrdtool-devel zlib zlib-devel subversion make python python-devel
#rpm -Uvh http://pkgs.repoforge.org/geoip/geoip-1.4.6-1.el6.rf.i686.rpm
http://pkgs.repoforge.org/geoip/geoip-devel-1.4.6-1.el6.rf.i686.rpm
2012年11月21日
2012年1月13日


2010年9月26日
一次無痛更新你的MSN mail<==最好不要嘗試
1/24更新
發現有聯絡人很久沒上線了、他也看不到我上下線、後來才發現、他那邊我的mail已經改成新的了、問題是我又改回來了=.=
只好叫他把我移除掉再重新加入
-----------------------------------------------------------------------------
前兩天在01看到這邊文章
一次無痛更新你的MSN mail
所以我就自己嘗試改了下去
不料改了新的帳號後、MSN是可以用新的登入沒錯
但是所有聯絡人都是未上線
大家看到我的狀態也是未上線
後來有人在同篇文章回了下面這個網址、表示也一堆人失敗了
http://hydemeow.pixnet.net/blog/post/20156834
我看到後馬上又跑去改回原來的帳號
還好改完以後一切正常
下次看到任何東西要嘗試前還是要多多搜尋一下網路比較保險
發現有聯絡人很久沒上線了、他也看不到我上下線、後來才發現、他那邊我的mail已經改成新的了、問題是我又改回來了=.=
只好叫他把我移除掉再重新加入
-----------------------------------------------------------------------------
前兩天在01看到這邊文章
一次無痛更新你的MSN mail
所以我就自己嘗試改了下去
不料改了新的帳號後、MSN是可以用新的登入沒錯
但是所有聯絡人都是未上線
大家看到我的狀態也是未上線
後來有人在同篇文章回了下面這個網址、表示也一堆人失敗了
http://hydemeow.pixnet.net/blog/post/20156834
我看到後馬上又跑去改回原來的帳號
還好改完以後一切正常
下次看到任何東西要嘗試前還是要多多搜尋一下網路比較保險
2010年9月21日
Gmail收到的信件都無法顯示圖片解決方法
莫名其妙、Gmail突然沒辦法顯示信件中的圖片了
還好google了一下就找到了解決方法
還好google了一下就找到了解決方法
http://www.google.com/support/forum/p/gmail/thread?tid=1e02999ed5328f62&hl=zh-TW
1 開啟 IE 瀏覽器後,
2 點選 "工具" 選項,
3 點選 "網際網路選項",
4 點選 "安全性",
5 點選 "網際網路",
6 點選 "自訂等級",
7 點選 最後一項設定將 "顯示混合的內容" 設定為 "啟動"
8 按"確定"
訂閱:
文章 (Atom)